ix: Word could not create the work file when Opening Word Documents
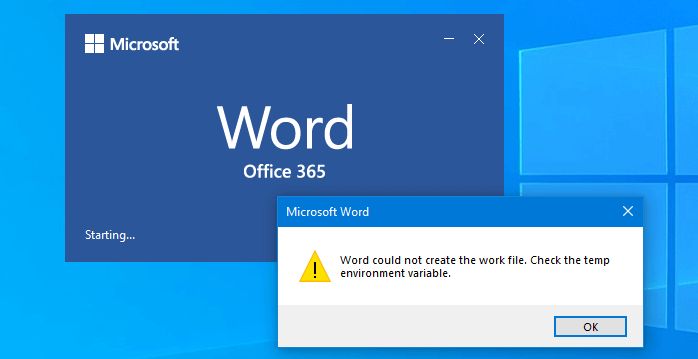
When you try to open or save a document in Microsoft Office Word, you receive the following error message:Word could not create the work file. Check the Temp environment variable.
The error message can also appear when you preview a .docx or .xlsx file using File Explorer preview pane.
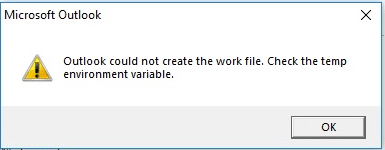
The same error occurs when you start any other Office application — e.g., Outlook, Excel, etc.,Outlook could not create the work file. Check the Temp environment variable.
Cause
This problem can occur if you’ve installed 64-bit Office earlier, uninstalled it, and installed the 32-bit version on Windows 64-bit. If a 64-bit version of Office 365 is installed, then uninstalled, and then a 32-bit version of Office 365 is subsequently installed, Explorer may not show document previews. Instead, an error may be shown:
Word: Word could not create the work file. Check the temp environment variable.
PowerPoint: Access denied. Contact your administrator.
Excel: This file cannot be previewed.
Outlook: Outlook could not create the work file. Check the Temp environment variable.
The above errors can also happen if the Temporary Internet Files location for Internet Explorer is set incorrectly. It could be possible that the Temporary Internet Files location is pointed to a folder location in which the user does not have permissions to create new temporary files. Office applications use the Temporary Internet Files folder to create temporary files when you open Office documents or preview a document using the File Explorer preview pane.
Easy fix: If you’re using Office 32-bit on Windows 64-bit Edition and facing this issue, you can fix the error by uninstalling the Office 32-bit version and installing the 64-bit version.
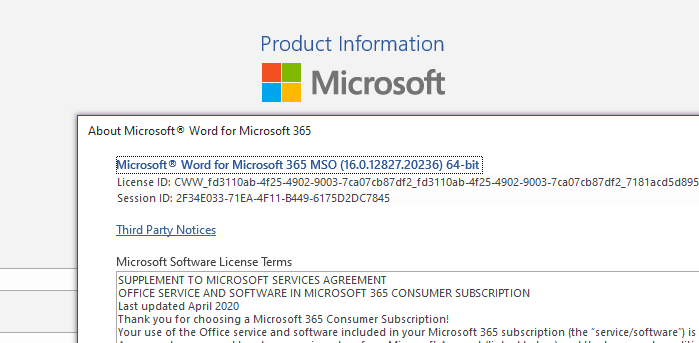
You can check the bitness of your Office installation by opening an Office product, click on the File menu, choose Accounts, and click the About button.
Fix: “Word could not create the work file” error
If installing the 64-bit Office is not a feasible option for you due to plugin compatibility or other issues, then here are some other solutions that help you get rid of the preview errors without having to switch to the Office 64-bit version.
Delete the Office 64-bit Previewer registry entries
If you’re running Office 32-bit Edition, then follow these steps to remove the 64-bit previewer registry entries. Follow these steps:
- Start the Registry Editor (
regedit.exe) - Go to the following branches one by one:[Word Preview] HKEY_CLASSES_ROOT\CLSID\{84F66100-FF7C-4fb4-B0C0-02CD7FB668FE} [PowerPoint Preview] HKEY_CLASSES_ROOT\CLSID\{65235197-874B-4A07-BDC5-E65EA825B718} [Excel Preview] HKEY_CLASSES_ROOT\CLSID\{00020827-0000-0000-C000-000000000046}
- Delete all of the above registry keys. Make sure you export each registry key to a separate .reg file before deleting the keys.
- Exit the Registry Editor.
- Logoff and login back to your account.
Windows will now use the preview handlers registered under the HKEY_CLASSES_ROOT\Wow6432Node\CLSID\ branch. This should fix the preview issues in Office 32-bit version running on Windows 64-bit.
Change the Temporary Internet Files location for Internet Explorer
Incorrect Temporary Internet Files location can cause Office document preview issues in Explorer. To fix this, follow these steps:
Method 1: Using Internet Options
- Open Internet Options (
inetcpl.cpl) - In the Internet Options dialog box, click the General tab.
- In the Browsing history section, click Settings to open the Website Data Settings dialog box.
- In the Website Data Settings dialog, click Move Folder to open the Browse for Folder dialog box.
- In the Browse for Folder dialog box, select the following location:C:\Users\<user name>\AppData\Local\Microsoft\Windows
- Note Whichever location you select, a folder that is called INetCache is created.
- Click OK to close the Browse for Folder dialog box.
- Click OK to close the Website Data Settings dialog box.
- Click OK to close the Internet Options dialog box.
- Logoff and login back to your user account.
Method 2: Using the Registry Editor
- Start the Registry Editor (regedit.exe) and go to the following branch:HKEY_CURRENT_USER\Software\Microsoft\Windows\CurrentVersion\Explorer\User Shell Folders
- Double-click Cache and set its data to:%USERPROFILE%\AppData\Local\Microsoft\Windows\INetCache(Make sure that the value named Cache is of type REG_EXPAND_SZ. If it’s showing up as REG_SZ, delete the value and create a new one.)
- Exit the Registry Editor.
- Logoff and login back for the change to take effect.
RELATED:Windows 10 User Shell Folders Restore Default Paths
Automate using .reg file
You can also apply the above settings using the following .reg file:
Windows Registry Editor Version 5.00

[HKEY_CURRENT_USER\Software\Microsoft\Windows\CurrentVersion\Explorer\User Shell Folders]
"Cache"=hex(2):25,00,55,00,53,00,45,00,52,00,50,00,52,00,4f,00,46,00,49,00,4c,\
00,45,00,25,00,5c,00,41,00,70,00,70,00,44,00,61,00,74,00,61,00,5c,00,4c,00,\
6f,00,63,00,61,00,6c,00,5c,00,4d,00,69,00,63,00,72,00,6f,00,73,00,6f,00,66,\
00,74,00,5c,00,57,00,69,00,6e,00,64,00,6f,00,77,00,73,00,5c,00,49,00,4e,00,\
65,00,74,00,43,00,61,00,63,00,68,00,65,00,00,00
In the above .reg file, the hex code simply refers to the following path:
%USERPROFILE%\AppData\Local\Microsoft\Windows\INetCache
Create the Office app temp folders
If the above solution isn’t sufficient, create the temp folders for Word, and/or Outlook manually. To do so, run the following commands via Command Prompt:
cd /d %USERPROFILE%\AppData\Local\Microsoft\Windows\INetCache
md Content.Word
md Content.Outlook

Check INetCache folder permissions
The INetCache folder has the following permissions by default:
NT AUTHORITY\SYSTEM:(I)(OI)(CI)(F)
BUILTIN\Administrators:(I)(OI)(CI)(F)
Computer_name\your_username:(I)(OI)(CI)(F)
To check the permissions, run the command in the Command Prompt window.
icacls %USERPROFILE%\AppData\Local\Microsoft\Windows\INetCache
Hope the one or more of the above methods helped you resolve the error “could not create the work file. Check the Temp environment variable” when starting Microsoft Word or Outlook. The solution should work in any version of Office and Windows, even in Office 365 Word 2016 running on Windows 10.